
Introduction
In iOS development, we often find ourselves working between two worlds: the old and the new. Languages like C++ and Objective-C belong to the “old world,” tried and tested, still powerful, and full of history. On the other hand, Swift represents the “new world,” bringing modern features and ease of use to the table. But sometimes, we need the strengths of both worlds working together, especially when using legacy C++ code in modern apps. This could be for various reasons, such as leveraging an existing C++ library, optimizing performance in computationally heavy tasks, or even sharing code between multiple platforms, like iOS and Android.
While Swift can’t directly communicate with C++, iOS allows you to bridge the two using Objective-C++. By introducing Objective-C++ into your project, you can take advantage of C++ modules and seamlessly integrate them into your Swift codebase. In this guide, we’ll walk through the process of importing a C++ module into an iOS project, bridging the gap between Swift and C++ with the help of Objective-C++.
In this article, you will learn how to import a C++ module by building a simple calculator. We’ll walk through the steps needed to set up your project, write C++ code, and connect it to your Swift app. By the end, you’ll have a working example and a clear understanding of how to mix C++ with iOS development.
Ready to get started? Let’s dive in!
Creating the C++ Module
First of all, let’s create 2 files Calculator.cpp and Calculator.h. For these files, we will create methods to execute the four basic operations: sum, subtraction, multiplication and division.
Your Calculator.h should look like this:
#ifndef CALCULATOR_H
#define CALCULATOR_H

class CalculatorModule {
public:
    static int add(int a, int b);
    static int subtract(int a, int b);
    static int multiply(int a, int b);
    static int divide(int a, int b);
};

#endif
And then we will implement the methods in the .cpp class. The methods are pretty simple so I will just put it here in the code snippet. The focus here is learning how to bring old dinosaurs to modern applications. That’s how your Calculator.cpp should look like.
#include "Calculator.h"

int CalculatorModule::add(int a, int b) {
    return a + b;
};

int CalculatorModule::subtract(int a, int b) {
    return a - b;
};

int CalculatorModule::multiply(int a, int b) {
    return a * b;
};

int CalculatorModule::divide(int a, int b) {
    return a / b;
};
That’s it. Our C++ module is complete and ready to be wrapped for iOS apps. So let’s check how we do this wrapping process
Wrapping the Module With Objective-C++
To wrap the methods is also pretty simple. Let’s create a folder called ObjCWrapper and within the folder, we will create two files: ObjCWrapper.h and ObjCWrapper.mm. I just want to make a quick observation here. To wrap your C++ module in ObjC++, the methods should be public, otherwise they will be inaccessible by the wrapper. So, this is our ObjCWrapper.h:
#import <Foundation/Foundation.h>

@interface ObjCWrapper : NSObject

- (int)addNumber:(int)a withNumber:(int)b;
- (int)subtractNumber:(int)a withNumber: (int)b;
- (int)multiplyNumber:(int)a withNumber: (int)b;
- (int)divideNumber:(int)a withNumber: (int)b;

@end
And this is the ObjCWrapper.mm:
#import "ObjCWrapper.h"
#include "Calculator.h"

@implementation ObjCWrapper

- (int)addNumber:(int)a withNumber:(int)b {
    return CalculatorModule::add(a, b);
}

- (int)subtractNumber:(int)a withNumber: (int)b {
    return CalculatorModule::subtract(a, b);
}

- (int)multiplyNumber:(int)a withNumber: (int)b {
    return CalculatorModule::multiply(a, b);
}

- (int)divideNumber:(int)a withNumber: (int)b {
    return CalculatorModule::divide(a, b);
}

@end
Basically it imports the Headers of the Wrapper and the calculator. Then it implements the methods of the Wrapper header and within these methods it calls the Calculator module methods. It won’t give you a hard time, it is pretty simple.
Constructing Your Pod
After wrapping the module, it is finally time to write our .podspec. The most important things when writing this pod are: To pass all the files the pod will use in the spec.source_files attribute; To specify the right compiler options in the xcconfig. Don’t worry, I will share the example here:
Pod::Spec.new do |spec|
    spec.name         = "Calculator"
    spec.version      = "1.0.0"
    spec.summary      = "A pod that wraps a C++ module"
    spec.description  = "This pod provides a wrapper around a C++ library for use in iOS projects."
    spec.homepage     = "http://example.com/MyPod"
    spec.license      = { :type => "MIT", :file => "LICENSE" }
    spec.author       = { "Your Name" => "your_email@example.com" }
    spec.source       = { :git => "http://example.com/MyPod.git", :tag => "#{spec.version}" }

    spec.ios.deployment_target = "12.0"
    spec.source_files = 'ObjCWrapper/*.{h,mm}', 'Calculator.h', 'Calculator.cpp'

    spec.pod_target_xcconfig = {
      'CLANG_CXX_LANGUAGE_STANDARD' => 'c++14',
      'CLANG_CXX_LIBRARY' => 'libc++'
    }
end
As I said before, you should pay attention to set the source files: spec.source_files = 'ObjCWrapper/*.{h,mm}', 'Calculator.h', 'Calculator.cpp' and to configure the xcconfig (located at the end of the file.
Installing the Pod in Your Application Project
There is no secret to install the pod, but using it can be a little bit tricky. So, let’s start with the installation. You should add the pod to your Podfile: pod 'Calculator', :path => '../CalculatorModule'. Don’t forget to pass the path if you are installing locally like me. Then run pod install in the terminal.
That was easy, right? Now, let’s make the module accessible to the project.
Making the Module Accessible for the Project
To make this module accessible, we need to do just two simple things: Create a Bridging Header and declare it to the swift compiler.
To create the bridging header, you need to go to File -> New -> File from Template, and then select Header File.

For the name, just follow the pattern: AppName-Briding-Header.
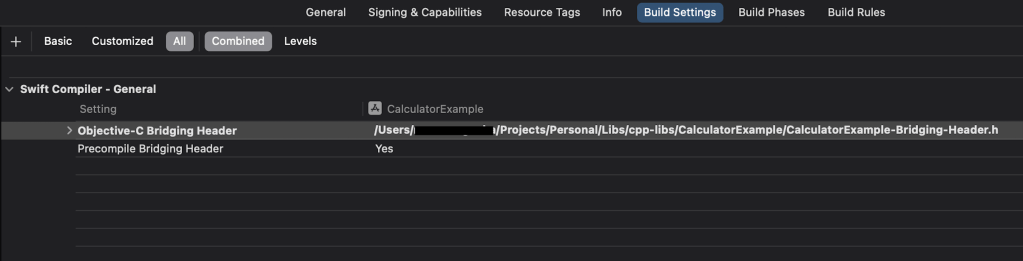
After creating the file, you need to declare it in the swift compiler, that’s also simple: Open the project build settings, search for Objective-C Bridging Header and set the path to your Bridging Header File (in my case I configured to Debug and Release).
By doing that, there is no need of importing the module like this: import Calculator. It makes everything easier.
That’s it! Everything is set and ready to go.
Using the C++ Module
As I said before, you don’t need to import anything, but you need to pay attention to one little thing. From Swift, you don’t call the Calculator, you call the Wrapper and its methods. The Wrapper is the one who calls the Calculator. When you call some method, it should look like this:
let wrapper = ObjCWrapper()
wrapper.addNumber(firstNumber, withNumber: secondNumber)
And that’s it guys, there you have your C++ module running in your iOS app. Pretty cool, huh?
Issues I Encountered and How I Solved Them
While setting up the project, I faced a few problems. Here’s how I solved them:
Problem 1: Pod Init didn’t work with Xcode 16.0
Solution: To solve that I just converted all the folders of the project into group. You can do that just giving a right-click into the folder and selecting Convert to group.
🔗 Link to the solution: https://stackoverflow.com/a/79003357
Problem 2: Unknown ISA error
Solution: Open the file project.pbxproj and search for objectVersion. Mine was 77 and I needed to set it to 56 in order to work.
🔗 Link to the solution: https://stackoverflow.com/a/79013326
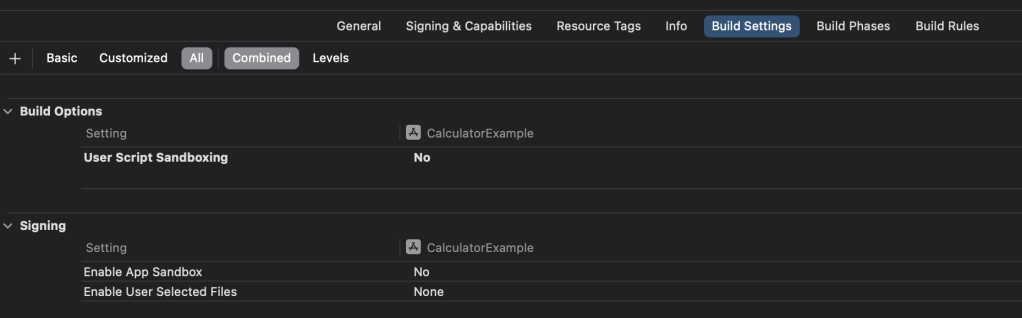
Problem 3: Script sandboxing error
Solution: Open the project build settings, search for User Script Sandboxing and set it to No.
Conclusion
While there were some hurdles along the way, the setup process isn’t as hard as it might seem. With a bit of patience and problem-solving, we can easily overcome any difficulties. Hopefully, these solutions help smooth out the path for anyone else working through similar challenges.
You can check out this implementation in my repo. I’d love to hear your thoughts, feedback, or any improvements you might have!

Leave a comment